Saturday, March 5, 2016

Kefir Yogurt!

I've got YOGURT KEFIR!!!

Yesterday I received my starter grains for making Kefir:
http://www.amazon.com/gp/product/B004RCSWGG?psc=1&redirect=true&ref_=oh_aui_detailpage_o06_s00


I followed the directions exactly.
That was yesterday.
Today I opened my little jam jar and I had this:
The blue strip is a warming belt...it helps to keep the jars warm...we have our house set at 66 degrees Fahrenheit so it gets kind of cool in our kitchen sometimes.
http://www.amazon.com/gp/product/B001D6IUB6?psc=1&redirect=true&ref_=oh_aui_detailpage_o03_s00
 

I took some of the kefir grains and put them with some goat's milk in another jar for
tomorrow's yogurt!  :o)


This made yogurt Kefir.... creamy style...not liquid style!
I couldn't be more excited and happy!
With a little goat's milk (or regular milk) and Kefir grains I'm having yogurt everyday!
Who knew it was that easy!!!! :o)


Friday, March 4, 2016

Snoopy and Scoby


SNOOPY:
I'm crocheting a little Snoopy for my daughter, Faith, who is playing Snoopy in a school play!  ;o)
http://bethsco.com/2011/12/snoopy.html#comment-6187
Free Pattern offered at BethsCo.com

SCOBY:
I finally received my scoby in the mail to make Kombucha!
I will post about this at a later date with a pictorial on how I made it and how it turned out.  :o)


SNOOPY:
I used the following free pattern:
http://bethsco.com/2011/12/snoopy.html#comment-6187
Makes a cute little "key chain" size Snoopy dog.

Materials:

KnitPicks Comfy Cotton yarn Sport weight
http://www.knitpicks.com/yarns/Comfy_Sport_Yarn__D5420179.html
White
Black


Size D 3.25mm crochet hook
http://www.amazon.com/Boye-Aluminum-Crochet-Hook-Size/dp/B000QHIMK2/ref=sr_1_4?ie=UTF8&qid=1457027207&sr=8-4&keywords=size+D+crochet+hook

Steel Crochet Hook size: 2
http://www.amazon.com/Steel-Crochet-Hook--Size-2-25mm/dp/B000QHH1GI/ref=sr_1_4?ie=UTF8&qid=1457115428&sr=8-4&keywords=Steel+crochet+hook+size+2


Polyester Fiberfill
(they have available in smaller quantities)
(Obviously you only need a tiny bit and any kind will do fine)
Mountain-Mist-Fiberfill-3-Pounds/dp/B0016ZZ92W/ref=sr_1_2?ie=UTF8&qid=1457029619&sr=8-2&keywords=corn+fiber+fill

450 Quick Dry Glue (Adhesive) 
http://www.amazon.com/Helmar-Quick-Adhesive-Fluid-Ounce/dp/B005E9ZS4K/ref=sr_1_1?ie=UTF8&qid=1457035333&sr=8-1&keywords=450+quick+dry+adhesive


Fray Check
(An old bottle of mine!  LOL!)
http://www.amazon.com/Dritz-674-Liquid-Sealant-0-75-Ounce/dp/B0019KBWA2/ref=sr_1_2?ie=UTF8&qid=1457112831&sr=8-2&keywords=Fray+Check

I take the cap that the Fray Check comes with off and make my own stopper with a bead glued onto a straight pin.  Quick and easy to use!


DMC size 3 Black (310) embroidery thread
http://www.amazon.com/DMC-115-3-310-Cotton-Thread/dp/B003W0FMOY/ref=sr_1_1?ie=UTF8&qid=1457113478&sr=8-1&keywords=DMC+size+3+Black+Embroidery+thread 

DMC Red 116 Pearl Cotton Size 8
http://www.amazon.com/DMC-116-8-321-Cotton-Thread/dp/B0001DUSYE/ref=sr_1_4?ie=UTF8&qid=1457116935&sr=8-4&keywords=embroidery+thread+RED


Gauge isn't important in the project.  Yeah!!  LOL! :o)

Head:

Starts at the nose area in white.  
The nose and ears are made separate and sewn on.

I finished the head and put the eyes, Nose, and ears on by pushing a threaded needle through this hole in the back of the head. Can you see the black thread ends stuffed in the hole? Dot it with a drop (only one drop) of Fray Check to keep the knots tight.
(I took these pics after the head was sewn to the body...don't be confused. :o)

Now when I close the hole all the black thread is hidden in the head. Cool huh?
Dot it with a drop (only one drop) of Fray Check to keep the knots tight and cut yarn.

Done!


Body:

Using a contrasting color piece of yarn to keep track of the end/beginning of round.
I am doing it in continuous rounds.

As I get smaller an smaller at the end I begin stuffing and also I start crocheting only in the
  front loops only.
This helps to keep my hook from picking up stuffing as I crochet.


LUNCH BREAK:
Home-made Chicken Noodle-less soup with sausage.
YUMM!!!!  
I'm on a low carb diet....diabetes runs heavily in my family...Dad's side. 

Back to work!

First I use a bamboo skewer to push in a last little bit of stuffing.

Finished the body. 
I will attach the head at this point. 


I put a tiny tiny bit of 450 Quick Dry Adhesive in the hole of the top of the body and pushed the head
down on it in the position I wanted it to be in.

See how it stays on by itself...no pins.  :o)

Now I am sewing the head and the neck together:

The head is attached and Snoopy has a neck.
Dot the yarn/thread where it enters the item with a drop (only one drop) of Fray Check to keep the knots tight

Here is the start of an arm...I will make 2 of course.  

First arm....


Here are the two arms:


Now he just needs a tail....

Every time after I hide a yarn end I dot the spot where it enters the item with a drop of Fray Check to keep it from coming out.

Now all the ends are hidden:

He needs a black spot on his back near his tail.
I used size 3 DMC thread in black and the size 2 steel crochet hook to do this.
First Row: 5 sc in a Magic Ring
Next Row: 2sc in each sc around

ON THE SIDE THAT WILL FACE THE SNOOPY:
Put a dot of Fray Check in the middle after you have pulled the Magic Ring tight.
Then cut the yarn that COMES FROM THE CENTER MAGIC RING.


Now I sewed the spot onto my Snoopy with the other yarn end.


Here he is all DONE!  :o)

I am making him a scarf out of red yarn....I have seen his scarf in yellow also but I like the red.
Using Steel Crochet Hook size 2 and DMC RED 116 Pearl Cotton size 8
Row 1: chain 25.
Row 2: sc in 2nd chain from hook and each chain across.
Hide ends.
Put on Snoopy!  :o)

I think my daughter will like him!  :o)

Wednesday, March 2, 2016

9" doll vintage style bloomers...

Doll Vintage Bloomers Knitting Pattern:


I made this doll that turned out to be about 8 1/2" to 9" .

http://www.ravelry.com/patterns/library/grace-notes-knit-doll

I want to make some outfits for her so I'm writing them down as
I make them so I can remember them.

I do all my items in the round if possible.
I will be using a circular needles with the magic loop method.
I will knit both legs at the same time.
I do this with either 2 seperate balls of yarn or using both ends of one skein.

Pattern for 9" doll vintage style Bloomers
Materials:
Sport weight yarn:
KnitPicks = Comfy Sport 50gm white and pink used in sample

http://www.knitpicks.com/yarns/Comfy_Sport_Yarn__D5420179.html

2.75mm needle .....(size 2 in American) Chiagoo used in sample
2.25mm needle.....(size 0 in American) Chiagoo used in sample

http://www.amazon.com/ChiaoGoo-40-Inch-Circular-Knitting-Needles/dp/B003W0ZKXC/ref=sr_1_sc_1?ie=UTF8&qid=1456945246&sr=8-1-spell&keywords=chiagoo+40+inch+2.75

Suggestion:
Put your yarn (ESPECIALLY white!) in a zip-lock baggie to keep it clean!  :o)

guage: 6 stitches to an inch using 2.75 needles

Legs (start at bottom)

WHITE: using WHITE yarn:
Cast on 25 sts
(I HAVE ADDED 1 STITCH AT THE END FOR AN EDGE!!)
(I used the long-tail method to cast on for each leg)
LEAVE about 10"tail to sew up the lace trim at the end.


(the lace trim is done back and forth.)

row 1: Knit   25 stitches 
(I start out with an extra knit row to ensure it doesn't curl)
DROP WHITE!  (do NOT cut!)

PINK: Change to PINK: 
row 2 through 4: flowers-in-a-row pattern  25 stitches 

(this is referring to MY pattern Rows) 

(I have added one stitch at the end for an edge stitch!!)
You will have an extra stitch at the end....just knit this stitch.

( you really need to watch the video to get this)
START : 5:04 minutes into the tutorial
This is ROW 1, FOR THE TUTORIAL, but Row 2, for my pattern.
https://www.youtube.com/watch?v=jG1GbXV17XU


See how I have started the 1st row for the flowers-in-a-row pattern= 5:04 minutes into video
 BUT
   it is the 2nd row for MY pattern?

* the hardest part of this pattern for me was in the second row..
  For the 2nd stitch in the row and all Wrap stitches:
INSERT YOUR NEEDLE IN THE NEXT STITCH FIRST! 
THEN WRAP 3 times AFTER you have inserted your needle in the next stitch as to KNIT
PULL ALL THREE WRAPS THROUGH the stitch AND LEAVE ON YOUR RIGHT NEEDLE!

*in the next row you are 
YOU ARE JUST WRAPPING THE 5 STITCHES YOU HAVE TRANSFERRED TO YOUR RIGHT NEEDLE>   JUST WRAPPING....I found that confusing at first glance.
* the last row is easy because you just knit every stitch....

DONE with the hardest part!!  :o)

CUT PINK!
PICK UP WHITE!
( I loosely tie the pink yarn end to the white yarn so the stitches don't get loose.)
Now you will arrange your stitches on your circular needle for the magic loop method so 
you can knit the legs in the round two at a time:-*
(You will be knitting 2 rows of stockinette stitch or all knitting = Row 5:Knit, Row 6: Knit)

How to set up for 2 at a time knitting:


Now make sure the wrong side is facing up at you.
On the picture above I can't see the little pink bumps on the bottom peeking through the white so I need to turn it over.  
The little pink bumps on the bottom white stitches show up on the wrong side.

Now that I have the wrong side showing I will pull a loop out half way through each set of knitting:
Below I did it for the left side:

And now below, I have it pulled through the right side set of kniting:


Now I have picked up the white yarn attached to the ball for the left side and started knitting:
DON'T FORGET TO CHECK AND MAKE SURE YOU HAVE THE CORRECT YARN FOR THE SET OF STITCHES YOU ARE WORKING ON!!!

At the point where there is the needle cable loop STOP.

Pull the back cable/needle through the back stitches

Pull the front cable/needle through the front stitches until you have a small cable loop on the right side of your knitting.


Now, FLIP your knitting over!
OOPS THAT'S NOT THE CORRECT PIC!!  LOL!
That's my mini-dachshund, Zoe, keeping an eye on the backyard!

Now, FLIP your knitting over!
(Put your working yarn up and over the front needle for correct placement.)
 Pull your yarn very tight for the first stitch!


Knit to the end of that row and put the working yarn up and over to the back of your work.


Pick up the working yarn for your next set of stitches and knit across to the loop:
DON'T FORGET TO CHECK AND MAKE SURE YOU HAVE THE CORRECT YARN FOR THE SET OF STITCHES YOU ARE WORKING ON!!!
Pull your yarn very tight for the first stitch!


Here I have finished as much as I can on the front of this set of stitches:

Now I will pull the back cable/needle through:


Now I will pull out the front needle:

Now I flip it and start knitting again:
DON'T FORGET TO CHECK AND MAKE SURE YOU HAVE THE CORRECT YARN FOR THE SET OF STITCHES YOU ARE WORKING ON!!!
Pull your yarn very tight for the first stitch!

Row 5: Knit in the same way for both sets of stitches. 25 stitches
DON'T FORGET TO CHECK AND MAKE SURE YOU HAVE THE CORRECT YARN FOR THE SET OF STITCHES YOU ARE WORKING ON!!!
Pull your yarn very tight for the first stitch!
Row 6: Knit 25stitches 
Row 7: K2tog, K4, K2tog, K4, K2tog,  K4, K2tog, K3, K2tog 20 stitches
Row 8-11: Knit 20 stitches   (using the separate ball of yarn for each side).

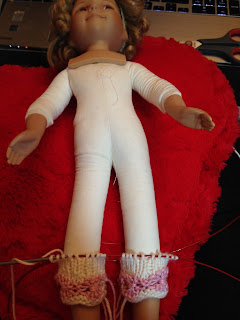
The first pic is the bloomers on my 9" doll. (the legs are not connected yet)


This second pic is of the bloomers on a 14" Diana Effner doll.
This pattern will work for her also if I just add a LOT of rows to the legs!  LOL!  :o)


CONNECTING THE LEGS....

Row 12: Knit the first set of 20 stitches for the first leg.  
Then CUT the second set of stitches working yarn about 10" long and let it drop.
(I cut the working yarn 10" long but it is mostly hidden in the back of the work.)

PICK UP the FIRST set of stitches working yarn and continue knitting across the 2nd set of stitches.


Flip it when you get to the end.
Knit right across the back.

 FLIP and knit to 1 stitch before the end of the second leg.
When you get to the LAST stitch before the end of that leg
 KNIT IT TOGETHER with the FIRST STITCH of the LEFT leg.

Continue knitting the next round and when you get to the other side
When you get to the LAST stitch before the end of that leg
 KNIT IT TOGETHER with the FIRST STITCH of the NEXT leg.

Can you see that I did the same between the back of the legs?


Put a stitch marker after the K2tog to mark the beginning of the row. (This is the center back.)
Knit 1 stitch....

Put your previous Row Marker (the RED thread) up between your needles then knit the next stitch.


When you have finished knitting the next stitch. stop and pull the (red) thread back down between the two needles.


See how it shows where the first row is located?
From now on you can use it to count the rows using the purl bumps above it.


Row 13 - 16: Knit (4 rows) 38 stitches
             You have already knit the first couple stitches of Row 13.

Switch to 2.25mm needle.....American size 0.
Row 14: {YO-Yarn Over the needle, K2 tog} to the end of the row

Row 15: Knit
Row 16: Cast off.

Thread pink ribbon through the eyelet holes made by the YO in Row 14.
Weave yarn in crotch area to close hole.
Use ends to sew the seams on the edge of the lace at the bottoms of the legs.
Weave in all other yarn ends. 
Put on your doll: